
Integrating Mailcow and SnappyMail on the Same VPS: Multi-Domain, SSL, and Custom Branding
Integrating Mailcow and SnappyMail on the Same VPS: Multi-Domain, SSL, and Custom Branding Mailcow already provides most of the components required to run a self-hosted mail server, including Postfix, Dovecot, Rspamd, DKIM, and administration interfaces for domains and mailboxes.
However, for webmail—especially when you want a simpler interface that can be branded for individual clients—SnappyMail can be an attractive alternative. In this implementation, Mailcow and SnappyMail run on the same VPS using Docker. SnappyMail does not replace Mailcow.
It only acts as the webmail client, while authentication, mailbox storage, SMTP delivery, DKIM, SPF, and DMARC continue to be handled by Mailcow. This article walks through the implementation, including several issues encountered during setup and how they were resolved.
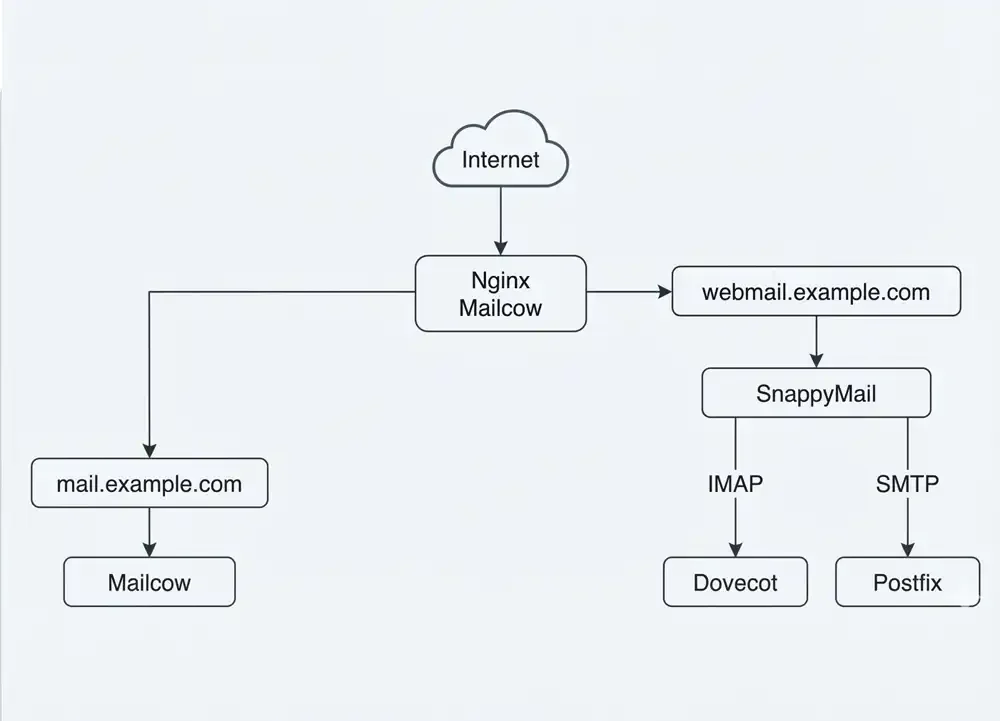
The basic architecture is straightforward:
Internet
   │
   ▼
Nginx Mailcow
   │
   ├── webmail.example.com
   │        │
   │        ▼
   │    SnappyMail
   │        │
   │        ├── IMAP
   │        ▼
   │      Dovecot
   │
   │        └── SMTP
   │             ▼
   │          Postfix
   │
   └── mail.example.com
            │
            ▼
          Mailcow
Mailcow remains the backend mail server. SnappyMail is used only as the webmail frontend. The backend configuration used in this setup is:
IMAP
Server   : mail.example.com
Port     : 993
Security : SSL/TLS

SMTP
Server   : mail.example.com
Port     : 587
Security : STARTTLS

SMTP can also use:

Port     : 465
Security : SSL/TLS
Both are valid. The difference is simply how TLS is established.
To avoid modifying Mailcow's main docker-compose.yml, SnappyMail is added through:
docker-compose.override.yml
Example:
services:
  snappymail:
    image: ghcr.io/the-djmaze/snappymail:v2.38.2
    restart: unless-stopped

    volumes:
      - ./data/conf/snappymail:/var/lib/snappymail

    extra_hosts:
      - "mail.example.com:host-gateway"

    networks:
      - mailcow-network
Validate the configuration:
docker compose config --quiet
If there are no errors:
docker compose up -d snappymail
Check the container status:
docker compose ps snappymail
The first issue appeared when SnappyMail attempted to connect to:
ssl://mail.example.com:993
and returned:
stream_socket_client():
Unable to connect to ssl://mail.example.com:993
(Connection refused)
Interestingly, Mailcow's Dovecot service itself was working normally. A direct test against the Dovecot container:
docker compose exec snappymail \
nc -vz dovecot-mailcow 993
returned:
dovecot-mailcow (...:993) open
The problem was that SnappyMail was trying to reach the server's public hostname from inside Docker. The solution was to add:
extra_hosts:
  - "mail.example.com:host-gateway"
After recreating the container:
docker compose up -d --force-recreate snappymail
the following tests succeeded:
docker compose exec snappymail \
nc -vz mail.example.com 993
and:
docker compose exec snappymail \
nc -vz mail.example.com 587
The advantage of this approach is that SnappyMail can continue using the official hostname:
mail.example.com
which means TLS certificate verification can remain enabled.
SnappyMail does not need to expose port 8888 directly to the internet. Instead, Mailcow's Nginx is used as a reverse proxy. DNS:
A
webmail.example.com
203.0.113.10
203.0.113.10 is a documentation-only IP address and is used here purely as an example.
mailcow.conf
For example:
ADDITIONAL_SAN=webmail.example.com
For multiple webmail hostnames:
ADDITIONAL_SAN=webmail.example.com,webmail.clientdomain.com
Apply the configuration:
docker compose up -d
Create:
data/conf/nginx/snappymail.conf
Example:
server {
    ssl_certificate /etc/ssl/mail/cert.pem;
    ssl_certificate_key /etc/ssl/mail/key.pem;

    root /web;

    include /etc/nginx/conf.d/listen_plain.active;
    include /etc/nginx/conf.d/listen_ssl.active;

    server_name webmail.example.com;

    server_tokens off;

    client_max_body_size 50M;

    location ^~ /.well-known/acme-challenge/ {
        allow all;
        default_type "text/plain";
    }

    location / {
        proxy_pass http://snappymail:8888;

        proxy_set_header Host $host;
        proxy_set_header X-Real-IP $remote_addr;
        proxy_set_header X-Forwarded-For $proxy_add_x_forwarded_for;
        proxy_set_header X-Forwarded-Proto https;

        proxy_http_version 1.1;
        proxy_read_timeout 300;
    }
}
Test the Nginx configuration:
docker compose exec nginx-mailcow nginx -t
If the test succeeds:
docker compose restart nginx-mailcow
The webmail interface should then be available at:
https://webmail.example.com
One of the more interesting issues occurred when Let's Encrypt successfully issued a certificate for one subdomain but failed for another. The ACME logs showed:
Found A record for webmail.example.com
Confirmed A record, but HTTP validation failed
Testing the challenge manually:
curl -i \
http://webmail.example.com/.well-known/acme-challenge/test
returned:
HTTP/1.1 404 Not Found
The problem was in the custom Nginx virtual host. The configuration already contained:
location ^~ /.well-known/acme-challenge/ {
    allow all;
}
but it was missing:
root /web;
Mailcow stores ACME challenge files under that web root. After adding:
root /web;
the ACME challenge became accessible. After renewing the certificate, the SAN entries were verified with:
echo | openssl s_client \
-connect 127.0.0.1:443 \
-servername webmail.example.com 2>/dev/null | \
openssl x509 -noout -ext subjectAltName
The required webmail hostname was then included in the certificate.
Once the webmail interface is accessible, each email domain must be added in the SnappyMail Admin Panel:
https://webmail.example.com/?admin
Example:
Domain
clientdomain.com
IMAP:
Server      : mail.example.com
Port        : 993
Security    : SSL/TLS
Short Login : OFF
Lowercase   : ON
Verify SSL  : ON
SMTP:
Server         : mail.example.com
Port           : 587
Security       : STARTTLS
Authentication : ON
Short Login    : OFF
Lowercase      : ON
Verify SSL     : ON
Short Login should remain disabled because Mailcow authenticates users with the full email address:
user@clientdomain.com
rather than:
user
After the configuration was completed, a test email was sent from SnappyMail to Gmail. The authentication results were:
SPF   : PASS
DKIM  : PASS
DMARC : PASS
A reply from Gmail was successfully received back in SnappyMail. A second reply containing an image attachment of approximately 200 KB was also delivered successfully. This confirms that using SnappyMail does not alter Mailcow's mail deliverability path. The flow remains:
SnappyMail
    │
    ▼
Mailcow SMTP
    │
    ▼
Postfix
    │
    ├── SPF
    ├── DKIM
    └── DMARC
    │
    ▼
Internet
SnappyMail functions only as the mail client.
One of the advantages of this architecture is that a single Mailcow instance can host multiple domains. For example:
example.com
client-a.com
client-b.id
client-c.com
All of them can use the same backend hostname:
mail.example.com
while each client can still have its own webmail address:
webmail.example.com

webmail.client-a.com

webmail.client-b.id

webmail.client-c.com
From the user's perspective, each service appears independent. From the administrator's perspective, everything is still handled by one Mailcow backend.
Initially, several hostnames were routed to the same SnappyMail container. This works, but it creates one major limitation: branding is shared. If:
webmail.example.com
and:
webmail.clientdomain.com
use the same SnappyMail instance, changing the logo or theme may affect both. The solution is to run separate SnappyMail containers. Example:
services:

  snappymail:
    image: ghcr.io/the-djmaze/snappymail:v2.38.2

    volumes:
      - ./data/conf/snappymail:/var/lib/snappymail

    extra_hosts:
      - "mail.example.com:host-gateway"

    networks:
      - mailcow-network


  snappymail-client:
    image: ghcr.io/the-djmaze/snappymail:v2.38.2

    volumes:
      - ./data/conf/snappymail-client:/var/lib/snappymail

    extra_hosts:
      - "mail.example.com:host-gateway"

    networks:
      - mailcow-network
Nginx can then route:
webmail.example.com
→ snappymail:8888
and:
webmail.clientdomain.com
→ snappymail-client:8888
The mail server backend remains the same.
To ensure custom branding survives container recreation, the theme should be stored on the host. For example:
data/conf/snappymail-client-theme/
└── ClientTheme/
    ├── styles.css
    └── images/
        └── logo.png
Mount it into the container:
volumes:
  - ./data/conf/snappymail-client:/var/lib/snappymail

  - ./data/conf/snappymail-client-theme/ClientTheme:/snappymail/snappymail/v/2.38.2/themes/ClientTheme:ro
The logo file only needs standard read permissions:
-rw-r--r--

or:

644
There is no need to use 777.
Example CSS:
#V-Login .descWrapper {
    width: 300px;
    height: 170px;

    margin: 0 auto 18px;

    background-image: url("images/logo.png");
    background-repeat: no-repeat;
    background-position: center;
    background-size: contain;

    text-indent: -9999px;
    overflow: hidden;
}
The background can also be customized:
html,
body,
body#rl-app {
    background-color: #f5f7f6 !important;

    background-image:
        radial-gradient(
            circle at 10% 10%,
            rgba(0,120,80,.08),
            transparent 30%
        ),
        radial-gradient(
            circle at 90% 90%,
            rgba(190,20,50,.07),
            transparent 30%
        ),
        linear-gradient(
            135deg,
            #ffffff 0%,
            #f2f7f4 50%,
            #fff8f9 100%
        ) !important;
}
With this approach, the login page can be styled to match the client's visual identity much more closely.
Another issue appeared while developing the custom theme.
The styles.css file had already been updated on the server. The updated CSS was also being served correctly over HTTP.
However, the browser continued displaying the old design. SnappyMail was caching theme data under:
data/conf/snappymail-client/_data_/_default_/cache/
In this case, clearing the cache resolved the problem:
rm -rf \
data/conf/snappymail-client/_data_/_default_/cache/*
Then refresh the page using:
Ctrl + Shift + R
The new theme should appear immediately. This is an important troubleshooting step when SnappyMail theme changes do not appear even though the server is already serving the updated CSS.
Mailcow also allows each client to have its own domain administrator account. For example:
Domain:
clientdomain.com

Domain Administrator:
clientadmin
That administrator can manage only the assigned domain. This allows the client to manage accounts such as:
user1@clientdomain.com
user2@clientdomain.com
finance@clientdomain.com
support@clientdomain.com
without gaining administrative access to other hosted domains. One error that may appear when a Domain Administrator creates a mailbox is:
Unlimited quota prohibited by ACL
This happens when the mailbox is created with an Unlimited quota while the Domain Administrator ACL does not allow unlimited mailbox quotas.
The solution is to define a fixed quota, for example:
5 GiB

or:

10 GiB
Besides resolving the ACL issue, this is also safer because it prevents a single client from consuming all available mail server storage.
If a domain is currently hosted with another provider such as Zoho Mail, there is no need to change the MX records immediately. A safer migration strategy is:
Existing Provider
     │
     │ IMAP Sync
     ▼
Mailcow
During synchronization:
MX → existing provider
remains unchanged. Create the same mailbox addresses in Mailcow first. Once historical email has been synchronized and the Mailcow mailboxes have been tested through SnappyMail, the MX record can be moved to:
mail.example.com
This approach reduces the risk of downtime or missing messages during migration.
Running Mailcow and SnappyMail together on the same VPS can provide a flexible multi-domain email platform.
Mailcow continues to handle the critical infrastructure:
SMTP
IMAP
mailbox
spam filtering
DKIM
SPF
DMARC
domain management
while SnappyMail provides a simpler webmail interface that is easier to customize. By separating SnappyMail instances per client, each hosted domain can have its own:
webmail.client.com
logo
favicon
colors
login page
even though all mailboxes still use the same Mailcow backend.
The key implementation details are ensuring Docker connectivity through host-gateway, keeping ACME challenges accessible through /web, storing custom themes in persistent volumes, and remembering that SnappyMail may aggressively cache theme assets.
Once those pieces are configured correctly, Mailcow + SnappyMail can serve as a solid foundation for a multi-domain email hosting platform with individually branded webmail experiences.
Integrating SnappyMail with Mailcow makes it possible to use Mailcow as the mail server backend while providing multi-domain webmail with different logos, themes, and branding for each client. This guide covers the implementation from installation to SSL and Docker troubleshooting.